Monday, October 29, 2007

Life on the edge--stitch patterns that can take it and not curl up (shown in pictures, knitting shorthand and diagrams)

Today's post reviews different kinds of knitted fabrics--ribbing, garter stitch, seed stitch, moss stitch-- which are adapted to life on the edge. These stitch patterns won't curl up when unsupported along one or more edges.

This post contains further review of reading knitting shorthand and charts, a subject raised in the previous post. It is followed by a whole series of posts about knitting better bands.(Link takes you to blog index.)

REVIEW OF NON-CURLING FABRICS

Stockinette curls. Ribbing doesn't, and neither does seed stitch, moss stitch, garter stitch. For a full explanation of why this should be, click here.

Non-curling fabrics are traditionally used at the edges of garments. Below is a review of these different non-curling fabric which are usually used as bands (bottom bands, front bands, neck bands and cuffs, also hat bands). These stitch patterns are also used as the "frame" around a flat item, such as a scarf or afghan.

1. Garter stitch (below)
(below) To knit garter stitch flat: knit every row. You will note that on this chart, the row numbers appear on opposite sides of the chart. This indicates that you are to knit flat (back and forth) because you can see that you are to start at a different edge for every row.
(below) To knit garter stitch in the round: *knit one round, purl one round* repeat.You will note that on this chart, the row numbers all appear at the same side of the chart. This indicates that you are to knit circular because you can see that you are to start every row at the same edge--a thing only possible if you knit around and around, coming back to the starting place with each round.

2. Ribbing (1x1) (below)
(below) To rib flat: on an odd number of stitches,
row1: *k1, p1* repeat until last stitch, k1
row 2: *p1, k1* repeat until last stitch, p1
repeat rows 1 and 2.
(below) To rib (1x1) in the round: every round on an even number of stitches, *k1, p1*

3. Seed stitch (below)
(Seed stitch is sometimes called single moss stitch)
(below) To seed stitch flat: every row, on an odd number of stitches, *p1, k1* repeat until last stitch, p1. A 4-row repeat is shown to give a bigger sample of the overall pattern.
(below) To seed stitch in the round: on an odd number of stitches,
round 1: *p1, k1* end with p1
round 2: *k1, p1* end with k1
rounds 3 and 4 are simply repeats of rounds 1 and 2, and are shown only to give a bigger sample of the overall pattern.

4. Moss stitch (below)
(Moss stitch is sometimes called double moss, Irish moss and small broken rib)
(below) To moss stitch flat: on an odd number of stitches,
row 1: *p1, k1* repeat until last stitch, p1
row 2: *k1, p1* repeat until last stitch, k1
row 3: same as row 2
row 4: same as row 1
repeat these 4 rows
(below) To moss stitch in the round: on a even number of stitches,
round 1: *p1, k1*
round 2: same as round 1
round 3: *k1, p1*
round 4: same as round 3
repeat these 4 rounds.
Do you see a pattern? Each of these stitch patterns puts a nearly equal number of knit and purl stitches on each face of the fabric. With knits and purl equally distributed on each face, there is no tendency for the fabric to curl. (Again, for more information stitch distribution this, click here.)

The next post (first of a long series) turns to the very edges of all these non-curling fabrics, and find out why the edges of your cuffs and collars, bottom bands and front bands are splayed out, or tight or just so darned WONKY!

--TECHknitter

PS:  If your problem is that your bands are flipping back, here are two different posts with ideas for you:
Non-flipping (zig-zag) bands (shows how to knit non-flipping bands by the zig-zag method)
Taming garter stitch band-flip (two parts: first part about setting up to knit non-flipping bands by a different method, second part about fixing garter stitch bands, already knit, which want to flip backwards).
(You have been reading TECHknitting on "four non curling knitted fabrics--pictures, charts and diagrams")

Saturday, October 27, 2007

How to read knitting shorthand and decode knitting charts


Knitting has its own language. UnFinished Objects become UFO's. A frog in a pond says "rip-it, rip-it" and so "frogging" has come to mean ripping back -- unraveling -- knitting. You can put a UFO into the frog pond, and most US knitters will know that you have unraveled a partially knitted project, although to a non-knitter this means, well, something different.

But not all of the knitter's language comes from jokes--a lot of it is shorthand. Here's how the shorthand developed:

Suppose you saw knitting directions written like this:
knit 1, then purl 1, then knit 1, then purl 1, then knit 1, then purl 1, then knit 1, then purl 1, then knit 1, then purl 1, then knit 1, then purl 1, then knit 1, then purl 1, then knit 1, then purl 1, then knit 1, then purl 1, then knit 1, then purl 1, then knit 1, then purl 1, then knit 1, then purl 1, then knit 1, then purl 1, then knit 1, then purl 1, then knit 1, then purl 1, then knit 1, then purl 1, then knit 1, then purl 1, then knit 1, then purl 1, then knit 1, then purl 1, then knit 1, then purl 1, then knit 1, then purl 1, then knit 1, then purl 1, then knit 1, then purl 1, then knit 1, then purl 1, then knit 1, then purl 1, then knit 1, then purl 1, then knit 1, then purl 1, then knit 1, then purl 1, then knit 1, then purl 1, then knit 1.

You COULD plow through all that. It is written in plain English, and the earliest knitting patterns actually did look like this. However, having to count up the exact number of knits and purl gets kind of wearisome and confusing. Perhaps we should write these instructions like this:
  • Knit 1, then purl 1, then repeat these two stitches 28 times more. End up by knitting 1 stitch, and then you are at the end of the row.
Even shorter is:
  • *k1, p1, repeat from * 28 more times, end with k1.
In this version, stars * * are used as the signal to enclose the action to be repeated. In other words, the stars surround the action to be performed --k1, p1--and you do that action 29 times altogether. One stitch will be left, and you knit that last stitch.

 A more modern version of this same instruction is

  • * k1, p1, repeat from * 28 times more, end with a k1.  
In this notation, the star indicates the beginning of the action, and the word "repeat" indicates the end of the action, as well as telling you what to do next. 


Now, suppose that you see this:
  • p1  ( *k1, p1* 2 times, *p2, k2* 2 times , p2, *p1, k1* 2 times) 2 times, p1
What in the world does THAT mean? Well, the same principles apply. The first thing to do is to p1. Next comes a set of instructions encased in parentheses ( ). The notation "2 times" after the close of the parentheses  indicates that you are to do everything within the parentheses 2 times altogether. Within the parentheses are THREE sets of instructions, each of which is encased in stars: the first is k1,p1, which you are to do 2 times; the second is p2, k2, which you are to do 2 times, then you are to do a single p2. Finally, you are to end each section with two repetitions of p1, k1. The point of the ( ) symbols is that you are to repeat everything inside the parentheses 2 times altogether.  After the two repetitions, the row ends with a single p1.

Knitters accustomed to these sorts of instruction can see this row clearly laid out in their mind's eye. This is a row of ribbing knit flat (back and forth). The row starts and ends with a p1. The rest of the row is divided into 2 sections. Within each section there is a center section of 2x2 ribbing (the middle set of stars), and this center section is flanked by 2 outer sections of 1x1 ribbing (the 2 outer sets of stars).  Further, the 1x1 ribbing backs up to the 2x2 ribbing in such a way as to create 3 p's in a row.

These sorts of instructions are perhaps not very user-friendly when you first see them. To add to the confusion, knitting is created from right to left, and from bottom to top, whereas English is written from left to right, and top to bottom. So, seeing this sentence fragment as a knitted row in the mind's eye requires not only decoding the abbreviations and symbols, but is also transposing left with right and up with down.

If you plug away at this, you will get it. But in the meantime, if you'd like a more graphic representation, perhaps you will consider charts.

Below is the same stitch pattern as above, laid out in both writing and in chart form.


(click on the chart to enlarge.)

As shown by the arrows, knitting charts are meant to be read in the same direction as knitting is created: from right to left. Many knitters find such charts easier to read because the pattern is laid out graphically.  For example, the alternating sets of ribs are now plainly displayed.

In this chart, knit and purl are shown by different colors, but other symbols also appear : a blank white square for knit and a bar - for purl is common; as is K for knit and a P for purl.  Nearly all charted patterns have a key to make all clear.

For more information on reading charts and shorthand, click here.

--TK
(You have been reading TECHknitting on "reading knitting shorthand and decoding knitting charts")

Friday, October 26, 2007

QUICKtip on conditioning knitting needles.


If your needles are grabby, run them through your hair (along the scalp) once or twice. The "preening oil" naturally on your scalp helps needles slide smoothly through yarn. 

If your needles are too slippery, put on clean rubber dishwashing gloves and massage the needles a little. Then drag each needle between your pinched thumb and forefinger--no water, just drag the needles between the pinched, dry glove. This clears oils to restore a better "tooth." 

For a very slippery needle not responding to this treatment, drag the needle through a barely dampened, doubled over "Mr. Clean Eraser." The "eraser" is actually just micro-scale sandpaper. 

One caution. Although some needles (especially bamboo and wood) respond splendidly, other needles (like Addi lace needles) have a coating which the "eraser" could ruin.

--TK

Monday, October 22, 2007

COWYAK--a waste yarn method of provisional cast on

includes 4 illustrations
On a Ravelry discussion board recently, several knitters were batting around various methods of provisional casting on. A consensus developed that the very best method of provisional cast-on is to simply cast on with some waste yarn, knit a couple of rows or rounds, then switch to the garment yarn. When the time comes to remove the waste yarn, there will be the garment yarn loops, waiting to be worked in the other direction.

In the course of the conversation, one commenter called this method the "cast on with waste yarn and knit a few rows" method and the next commenter condensed this to the catchy name "COWYAK." Sounds good to me, so, with permission, I'm adopting COWYAK as the acronym for this method: the letters stand for "CAST ON (with) WASTE YARN AND KNIT."

There is nothing revolutionary about the method itself--machine knitters cast on with waste yarn all the time, as do many hand knitters. However, it is a good technique to remember, and giving it a name makes it even more useful--it's going to be handy to be able to refer to this technique by the name COWYAK, instead of launching into a full-blown description every time.

The reason (imho) why COWYAK works better than any other method of provisional casting on is that the garment loops which will ultimately be worked "down" are more protected with COWYAK than with any other method. With ordinary provisional casts on, the garment loops to be worked "down" stay right at the edge of the knitting during the entire course of the work. Being at the edge like that subjects these stitches to wear and abuse. By contrast, with COWYAK, these loops are several rows or rounds into the fabric, and so are better preserved.

Here's how to do it:
1. (below) In this illustration, the work was begun by casting on with waste yarn (green) and kitting a couple of rows. Next, the garment yarn (pink) was worked into the next row, and several additional rows were knitted.
2. (below) When the time comes to remove the waste yarn, it is removed up to the last row (easiest way is to snip one stitch at the edge of the last row of waste yarn). This last row is unpicked with a knitting needle, one-half stitch at at time, and each freed stitch is immediately caught on a needle to prevent runs, as shown.
3. (below) After all the waste yarn is removed, the tails of the garment loops are "live loops," capable of being knit "down," (i.e. in the opposite direction from the original knitting of the garment loops).
Here are some further tips for COWYAK:
  • 1. Use waste yarn of the same weight as the garment yarn--this helps maintain correct tension on the first row of loops in garment yarn.
  • 2. Cotton works well as waste yarn, because it will not mat or felt together with the yarn of the garment.
  • 3. A further refinement is to run a life line through your first row of garment loops, so when waste yarn is removed, the garment yarn cannot run out.
  • 4. A further refinement is for use patterned fabrics: You can do a repeat in the waste yarn as a "warm up" for the garment fabric.

*THANK YOU* to Ravelers Msmcknittington and Swroot for being the naming team which came up with the acronym COWYAK, for permission to use same, and for posting about refinements 3 and 4. *THANKS* also to Valerie and Kathryn who commented on this post, pointing out confusing usage accompanying the third illustration (usage which has now been corrected).


(Addendum 2013) Well!  evidently, there really IS such a thing as a cow-yak hybrid_  it is called a cak, and here is a photo. 

--TECHknitter
(You have been reading TECHknitting on: COWYAK-- a method of using waste yarn for provisional cast on.)

Wednesday, October 17, 2007

Fixing errors at the sides edges of your knitting

includes 12 illustrations

Have you ever had a terrifying mess like this at the side edge of your knitting?

A mess like this occurs when stitches come loose at the edge and run out. Perhaps a stitch slipped off the needle, perhaps you dropped a stitch near the edge to correct an error and things got out of control. Whichever way it happened, the mess looks scary. A run at the side edge of your knitting creates loops --giant loops--that look nothing like the ladder of an ordinary run.

Most knitters (including, for many years, me) would rather rip back a mess like this than try to fix this on the needles. However, from now on, the situation is altered. No longer do you need to rip back: you can go your way rejoicing. In the same way as you can use a crochet hook to efficiently correct an ordinary run, so you can use a crochet hook to correct a run which occurs at the edge...if you keep your wits about you.

In person, the problem looks worse than it actually is: the curl at the edge of most knitted fabrics contributes to the confusion, and the loose loops overlay one another. If you could take away all the curl in the fabric and organize the overlapping loops--if you could lay the mess out neatly--the problem would look like the illustration below. (In this illustration, the three edge stitches have become unmoored, and have run out 6 rows down.)


Below are two different ways to fix this problem, depending on how you created the very edge stitch--the selvedge stitch--when you first created the fabric. Many knitters (myself among them) always run a chain selvedge in the fabric--created by slipping the first (or last) stitch on every row. (For complete instructions on how to create a chain selvedge, click here.) One reason to run a chain selvedge is that it makes correcting errors in the side edges easier. The first set of illustrations below (numbered with pink circles) show how to correct a run when the fabric was originally knitted with such a chain selvedge.

However, not every knitter runs a chain selvedge in their work. If you are a knitter who knits every stitch on every row, it will be slightly more complicated to fix runs at the side edges--it requires you pin the the fabric to a board in order to fix it. However, although more complicated, it is by no means impossible, and the second set of illustrations (numbered with green circles) shows how.

CORRECTING EDGE ERRORS when the fabric has a CHAIN SELVEDGE

1 (below) In this illustration, three edge stitches have run down 6 rows. The 3 edge stitches of the last row NOT to run out are called the "foundation row" and are labeled by color. The very edge stitch is red, the two interior stitches are green and blue.

Due to the chain selvedge, the red stitches will be hooked up in a 1-for-2 pattern--1 edge stitch for every 2 rows. Because 6 rows raveled out, there will be a total of 3 edge stitches to be recreated. The two interior stitches, the green and the blue, will be hooked up in an ordinary 1-for-1 pattern--1 stitch per row. Because 6 rows ran out, 6 total stitches in each column need to be recreated.

2. (below) Begin by hooking up the red edge stitch as shown. Remember that for a chain selvedge, the outer edge of each loop need only be drawn through once.

3. (below) Continue hooking up the red stitches along the outside edge of the loops. As you can see, this process begins to turn the loops into something more closely resembling ordinary ladders in the area above the green and blue stitches.

4. (below) Once the red stitches have all been hooked up and deposited on the needle, begin with the green stitches. Unlike the red stitches, which are chain selvedge stitches--hooked up 1 stitch per 2 rows--the green stitches are ordinary stitches, and are hooked up one stitch per row, as shown.

5. (below) Once the green stitches have been hooked up and deposited on the right knitting needle, hook up the blue stitches in the same manner, as shown.

6. (below) The finished product. Of course, it will not look all neat like this--it will be wonky because the tension has been much disturbed. However, some careful picking at the stitch arms with your knitting needle will adjust the tension better. Wearing and blocking will smooth things out further until, over time, you won't be able to tell there was ever a problem.

CORRECTING EDGE ERRORS when the fabric has an ORDINARY SELVEDGE

1. (below) When you are running an ordinary selvedge, the work of correcting an error at the edge is a little more complex. The trouble arises because the outer edge of each loop must be turned into two stitches--one above the other, to match the fact that every stitch of every row was knitted. Stated otherwise, because the edge stitch was not slipped, you must have the same number of stitches along the edge of the work as in the interior columns. This takes a little hocus-pocus to create, but, with the help of pins and a board, a run on this sort of edge can also be corrected. Begin by pinning out the loops, as shown. Next, draw the "bottom" part of the outermost portion of the loop into the foundation stitch (red) with a crochet hook as shown.

2. (below) Once you have drawn up the part of the loop below the pin, you next draw up the outermost part of the loop above the pin. In other words, the red stitches are hooked up once below the pin and then again another time above the pin. This creates 2 stitches at the outer edge of every red loop.

3 (below) Once the edge stitches have been created, the pins can come out, and the two interior columns (green and blue) are hooked up in the same manner as shown in illustrations 4 and 5 of first series (with pink circles, above). (However, if you find it easier, you need not remove the pins until you have hooked up all the columns.)

4. (below) The finished work. As stated above, the tension will be wonky when the error is first fixed. However, judicious tension readjustment of the stitch arms with a knitting needle, coupled with blocking and wear, will all act together to smooth out the area until no trace of the correction shows.

One last thing: The run-out loops in these illustrations are not to scale. A loop resulting from 5 or 6 raveled out stitches is relatively longer than the illustrations. Paradoxically, once you start hooking up, the ladders are relatively shorter than they appear in these illustrations. If you need to use a very small hook indeed for the interior (green and blue) stitches, no fears--you're not doing it wrong.


--TECHknitter
((You have been reading TECHknitting on: "Correcting errors at the side edges of your knitting")

Friday, October 12, 2007

QUICKtip: improve long-tail cast on with a KNOT

The long tail is the method I most use for casting on. (For the reasons I like it best, and for a tutorial on how to do long tail cast on, click here.) However, although it is my fave, the fact is that the larger the number of stitches to be cast on, the less accurate the estimation will be for the length of the tail.

I was pondering this for the nth time a couple of nights ago when a BIG idea jumped into my head--what if the tail were actually a separate piece of yarn? That would make long tail casting on far more feasible where LOTS of stitches are needed -- a man's sweater, the edge of a poncho, a shawl started along the long edge, a blanket. (Above) The easiest way to work this caper is to simply knot both ends of the skein of yarn together. On the upside, you could cast on eleventy-seven stitches and you'd never run out of yarn by allowing a too-short tail. On the downside, you'd have extra ends to work in, but the weaving-in method or the held together tail method from the 3-in-in TECHjoin should take care of the extra loose ends without too much trouble (and in flat garment knitting, you can use at least one of these tails, left long at each side, to seam the garment).

(Above) The "knotted stitch" does NOT figure into your stitch count--before knitting the second round, drop the "knotted stitch" right off the needle. The first true stitch now presents as the first stitch of the row.

Ordinarily, both strands of the long-tail cast on would be in the same color--the 2 colors are for illustration purposes only.

Addendum 10-13-07: A sharp-eyed reader, Talvi, wrote in the comments that I seem to have unvented provisional long tail cast on. And so I have--Talvi provided this link, and sure enough, there it is: a long tail cast on with a knot! Summarizing briefly, the idea of using long tail casting on with a knot as a provisional cast on would be to really and truly use two different colors of yarn, as in the illustration, and then pick out the bottom loops (red in the illustrations). This would leave the top loops (white) on the needles, and the tails of those white stitches could then be treated as stitches to be worked in the opposite direction.

However ... as cool as long tail casting-on with a knot is, I personally would use it only where LOTS of stitches were wanted--I would not use it as a provisional cast on. Years ago I messed around with pulling out the bottom thread of conventional long tail cast on as a method of provisional cast on, and rejected it for these reasons:
  • 1. The bottom yarn is on the needle pretty tightly in long tail casting on (and this is equally true regardless of whether you cast on over one needle or two). It takes some determined picking (or cutting) to get it loose--as you can see from the diagram, the bottom yarn actually forms loops that double back on themselves.
  • 2. All that picking, plucking, snipping and pulling compromises the tension of first actual row of stitches, if not the actual integrity of the stitches themselves.
  • 3. There are better ways to provisionally cast on--methods that unzip more readily.
  • 4. Even if an actual method of provisionally casting on seems too much trouble, or too complicated to wrap one's mind around, a couple of rows or rounds in waste yarn is the easiest and best method of provisional cast on ever invented--the appearance of the first actual row or round of stitches is the VERY BEST with the waste yarn method because these stitches came from "inside" the fabric and have no tension issues at all.

However, as in all things knitting, your mileage may vary--using long tail casting on with a knot as a provisional cast on might work well for you despite the fact that it doesn't work well for me.
In any event, a REALLY BIG *THANK YOU* to Talvi for bringing up this information!

--TECHknitter
(You have been reading TECHknitting on: "use a knot to improve your long tail cast on.")

Tuesday, October 9, 2007

Left leaning decreases: the runners up--an uber-geek techno-weenie presentation

includes 17 illustrations
Ok, I gotta say it: those were a lot of comments to the last post--the one about the possibility of including some sewing techniques. Many thanks to all who responded, and to all who will respond. The drawing for the prize--the $20 gift certificate to Knitpicks--will be on TECHknitting's blogiversery post (Nov 5, 2007). In the mean time, it's back to mundane nuts and bolts stuff about knitting--today's post is about MORE left leaning decreases.


The current series on left-leaning decreases is the result of a lot of experimentation over a lot of (pre-internet) years. At different times, different left leaning decreases were my favorites, but now I have settled on two: the SYTK and the Crochet Hook Method (CHM), each of which previously starred in a post of its own. However, that doesn't mean that some of the other left-leaning decreases with which I flirted weren't handsome creatures, too. I've picked the runners up below. One of these, runner up #2, is a specialty decrease you might want to remember for those situations where you HAVE to make a left leaning (as seen from the front) decrease by working from the back (purl) side of the knitted fabric.

Before we plunge in, I must warn you: this is one of the geekiest (and longest) TECHknitting posts yet. If deep-seated geekishness is not in your nature, you might want to flee read a different blog for today...

If you're still game, here we go with 5 more left leaning deceases. Each one of these, IMHO, is an improvement on ssk and psso, but some are better than others. I've arranged these in reverse order according to my own scale of desirability (yours may vary). Runners up number 5 and 4 I find to be barely an improvement over ssk, while runner number 1, discussed last, is the one I'd go with if SYTK and the CHM suddenly fell off the face of the earth.

* * *

RUNNER UP DECREASE #5: Slip, Knit (sk) In this variation on slip, slip, knit, only the first stitch is slipped knitwise to the right needle and then returned to the left needle (illustration 1, below) The second stitch in sk remains on the left needle and is knitted together with the slipped and re-slipped stitch from its original position (illustration 2, below).The finished sk adds a half-twist to the second (green) stitch, and so removes some of the slack from the top (red) stitch. It is also faster than ssk, as it takes fewer movements. This makes it something of an improvement over ssk, but, at least in my hands, sk remains far from a perfect match for k2tog. Further, even if you liked sk, it'd be easier to do runner up decrease #2, the 1-step sk.

* * *

RUNNER UP DECREASE #4: One-step sk. This is an improvement over runner up #5, regular (two-step) sk, because, as you can see, the finished product for 2-step sk and 1-step sk are identical, but the one step variation is quicker. One-step sk is so nifty and time-saving that it was my steady date for a long time, we went through many great times together. Yet ultimately, I had to move on. Sadly, over time, I was forced to acknowledge that the result of sk (one- or two-step) is pretty much the same as ssk--too much stretching of the top (red) stitch leaves it loose and sloppy on the fabric surface.

* * *

RUNNER UP DECREASE #3: Changing the orientation of the stitches in the row below at the time those stitches are created. In this variation, the stitches to be worked together in the decrease column (the green stitch and the red stitch) are knitted so as to change their orientation on the face of the work--in other words, they are knitted so that AT THE TIME OF CREATION, they lay LEFT arm forward, not right arm forward, and makes them already oriented for ssk. Stated yet otherwise, creating the green stitch and the red stitch to lie left-arm forward means there is no reason to do the slip knitwise, slip knitwise part of ssk--the green and red stitches are CREATED to lay the "slipped" way, ready for the final knit with no further steps to be taken at the time of decrease.

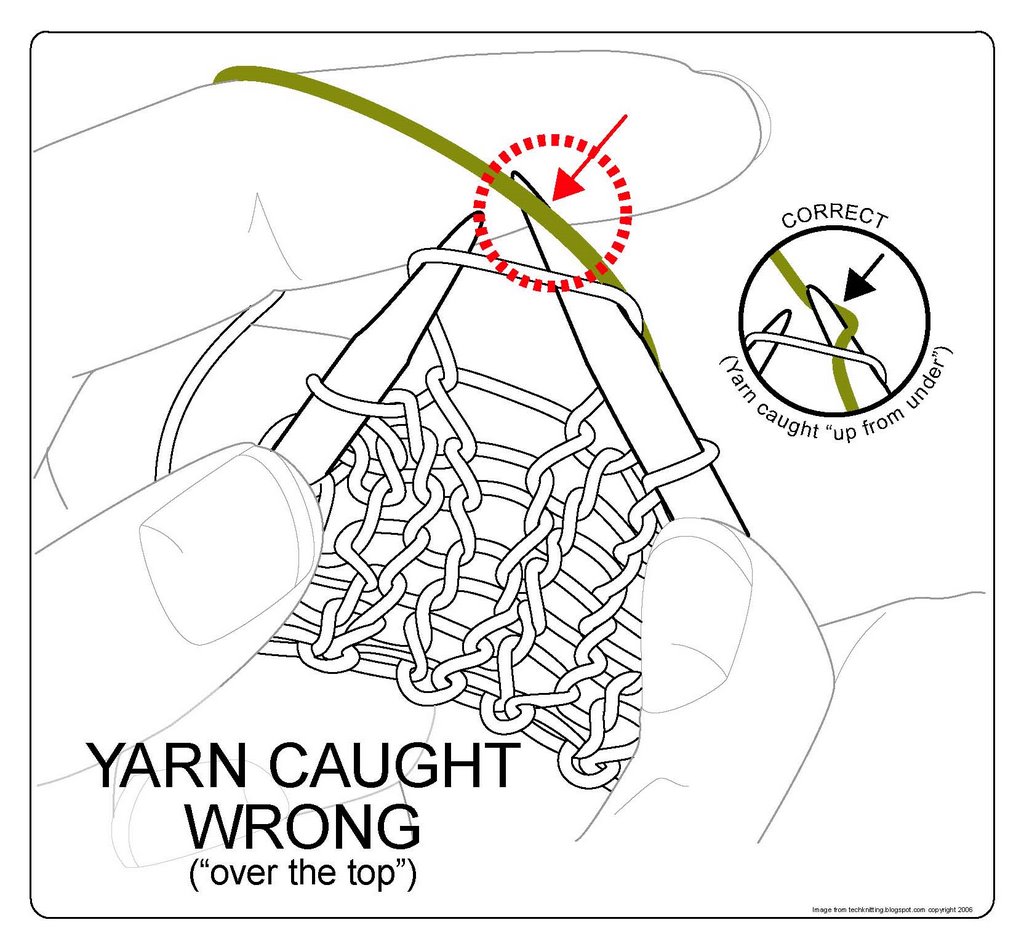
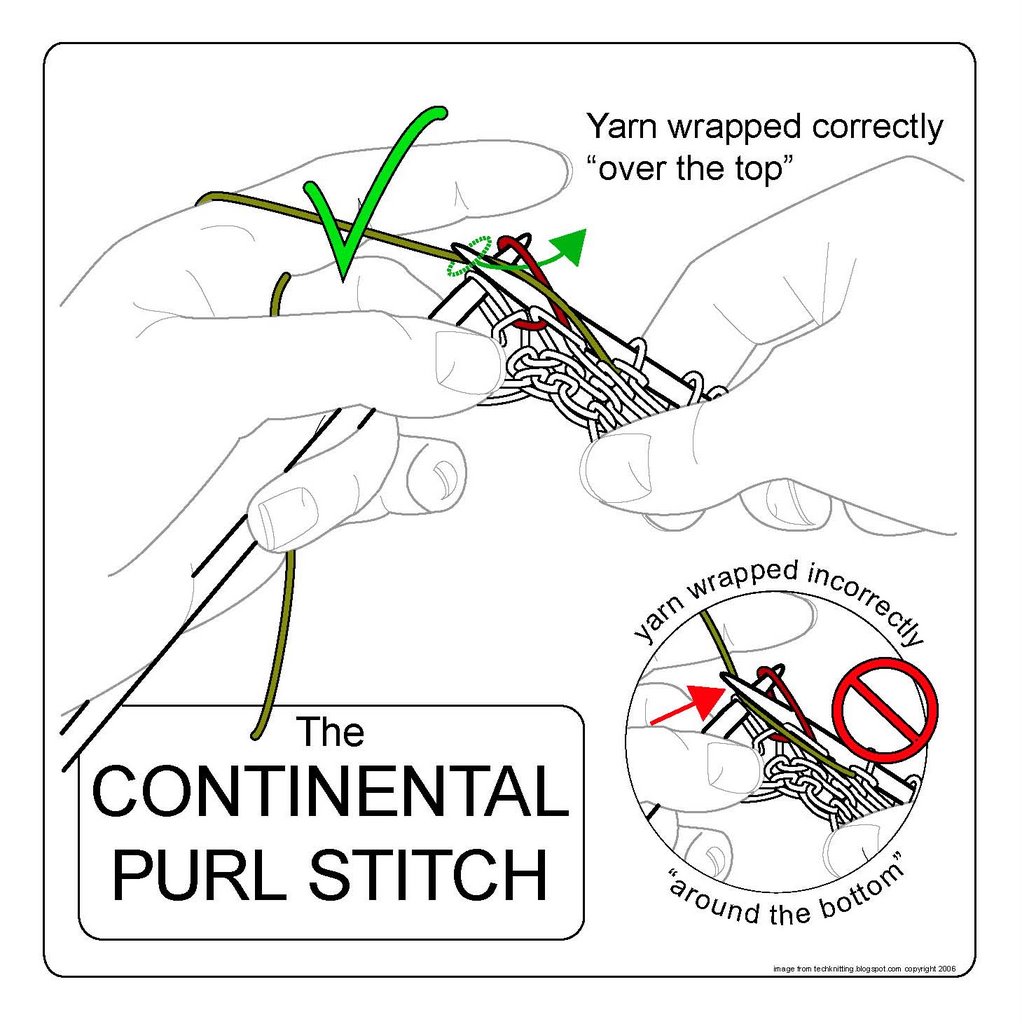
As to how the change in orientation is made at the time of creation, this depends on whether the work is circular or flat. If circular, the stitches to be decreased (the green and the red) are oriented left arm forward when knitting on the face of the fabric. This is done by means of wrapping the standing yarn "over the top," when knitting these two stitches, a mode of yarn wrapping usually labeled "wrong." For flat knitting, the change of orientation is made on the back while purling by means of wrapping the yarn "around the bottom," again, a mode of yarn wrapping usually labeled "wrong." The stitch which does the joining--the blue stitch--may also be oriented left arm forward; this is done by wrapping the standing yarn as shown, before knitting this stitch (i.e. wrapping "over the top")
Thinking logically, orienting the stitches to be knit together so they lay left arm forward at the time of their creation would mean there is *NO MANIPULATION* necessary, no "slip, slip." This is a potentially wonderful boon. And, for some knitters, this solution does work--a good and pleasant outcome. My knitting philosophy is: "Do what works for you." There are various successful ways to knit and we are not martinets. I will share with you, however, that I have never been notably successful with this technique--for me, the creation of stitches which cause a couple of changes of orientation within the row ruffles the fabric face in a distracting manner. If you are interested further, there is a great deal more about why I believe this is so here. (I have put this discussion on a "click through" page instead of in the main blog because experience shows that an eager minority of knitters--you know who you are!--can be passionate about change-of-orientation issues. For these readers--a whole separate page awaits.)

* * *

RUNNER UP DECREASE #2: Re-arranging the order of the stitches on the back.
Step 1, below: Slip the first purl (red) stitch to a stitch holder (here, a bobby pin) and hold it on the side of the fabric towards you Step 2, below: Slip the next purl stitch to the right needle purlwise (right arm forward). Replace the first stitch onto the left needle, right arm forward, then return the second stitch to the left needle by slipping it back from the right needle. This re-arranges the stitches--puts then in different order than they started off. As you can see, the green stitch, which will lie on the fabric surface, crosses in front of the red stitch.

Step 3, below: Give the red stitch (the one which will stay on the back of the fabric) a mighty yank. This draws the slack away from the top stitch (green) on the fabric face. insert the right needle into these two stitches in the usual manner for purling. Next, insert the right needle in the usual manner for purling. Step 4 (below): Purl the red and green stitches together for the finished product.
I think this method of re-arranging the stitches from the back is an improvement over ssk. The manipulation mainly takes place with the red stitch which will wind up behind. This draws slack yarn away from the face of the fabric for a tidier top (green) stitch, especially once you add the "mighty yank" step to the red stitch.

However, it two disadvantages which I find offputting. First, it must be worked from the wrong side--the purl side. In stockinette, at least, this means a stitch holder, for it is far more difficult to be sure of one's place in the wilderness of purl bumps on the back than on the smooth front where decreases show. Yet, even the thinnest stitch marker leaves a trace, for at least some extra yarn must be used to "bridge over" the marker. Adding extra slack where too much slack already accumulates doesn't strike me as a good idea. Second, working with a stitch holder slows down the work. I do admit that in practice, the holder is probably not necessary unless the yarn is ultra-slippery. After all, a single stitch temporarily taken off the needles will not go far. Yet, re-capturing a loose stitch is annoying in its own right, and the more so in splitty yarn (superwash, silk, cotton, alpaca...).

Despite these disadvantages, however, you might want to put this one in your memory bank for the rare occasion when you are to make a leftward decrease on EVERY row, and you are working a flat piece of knitting. The reason? This from-the-back method is a perfect match (when viewed from the front) for ssk and a pretty good match for SYTK. Stated otherwise, there will be little noticeable variation between decreases done from the front by ssk or SYTK, and decreases made from the back by this method.

* * *

RUNNER UP #1: Re-arranging the order of the stitches on the front of the fabric at the time of making the decrease (they don't stay disordered--they end up just like ssk, only tidier). This solution to the ssk problem works for the same reason re-arranging from the back works: the second stitch (the one behind--the green one) is manipulated more than the one in front (red) which pulls slack yarn away so the top (red) stitch lies neater and tidier than an ordinary ssk. Just as in the method of re-arranging from the back, in this method, too, it is best to give the stitch behind (green) a big yank, to transfer even more excess yarn to the back of the fabric.

Despite the real improvement this method displays over an ordinary ssk, this still isn't my fave--it involves a holder (or it involves re-capturing a loose stitch) and (to me--your mileage may vary) doesn't look as good as SYTK. The sequence is identical to that for re-arranging from the back side, the only difference being you do it from the front (and likely do not need a marker to show where the line of decrease is).

As you scan over these pictures, it will, of course, occur to you that you could easily twist the green stitch, thus conferring some of the advantages of SYTK on this method too, but if you're going to do that, why not just go with SYTK in the first place?

* * *

This list of alternate left-leaning decreases is by no means exhaustive. My fellow-blogger Nona (she of the side-to-side socks) offers a beautifully photographed series in which she experiments with 7 types of left leaning decreases. (Nona's been MIA since late August--say you're coming back, Nona!) And even MORE decreases exist: some even appear in the comments to previous posts in this very series--and many THANKS are due those who posted their own personal faves.

If you've gotten to the bottom of this post--if you're still standing after all this verbiage about left-leaning decreases, then you deserve an award. (The knitting-needle cluster is bonus for those who also went to the click-through page about change of orientation.) Congratulations! You are one of the few...the proud--the uber geek techno-weenies of knitting!

And, hey, while we're speaking of uber-geek -techno-weenies, a BIG thank-you goes out to Persnickety Knitter who sent an e-mail correcting a typo in runner up number 2 (the typo has been now been fixed). *Thanks* Persnickety!

--TECHknitter
You have been reading TECHknitting on "5 alternative left leaning decreases"