Hand knitting involves drawing new loops through old. So first, you have to HAVE some loops. Putting the first row of loops on your needle is called "cast on" or "casting on," abbreviated "CO."
There are several main kinds of casting on in this world including knitting on, and looping on (the subject of the next two posts). THIS post is about--
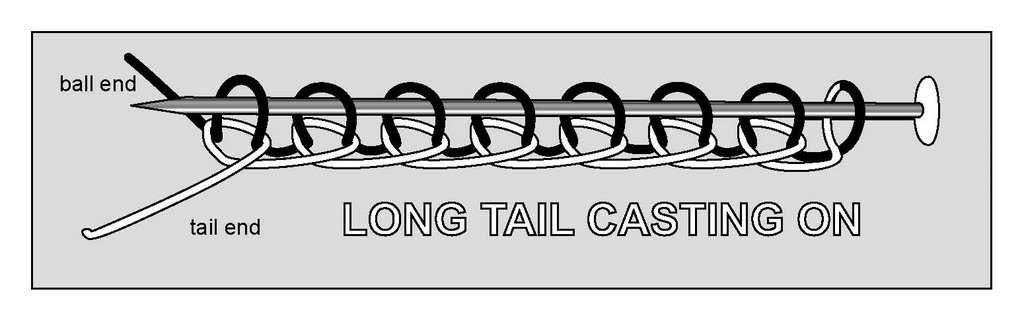
LONG TAIL CASTING ON
In many kinds of casting on, you first make a floppy sort of foundation row, often a row of simple loops which happily share yarn with their neighbors: growing or shrinking with the merest tug. To start your knitting, you must chase these skittering loops around the needle. It isn't until the third or fourth row that you get a rhythm going, and the foundation row often looks lumpy and distorted.With long tail cast on, you don't have these problems because you make the foundation row AND knit the first row at the same time--that's why it's my favorite. In other words, long tail casting-on produces a uniform row of loops already pre-knit into the underlying foundation row. These loops and the foundation row stabilize one another.
Another advantage: for circular projects, other kinds of foundations are a bit skimpy; they're hard to hold right-side up so as to avoid making the dreaded moebius strip. In long tail cast on, you've actually created a looped foundation row AND a first row of knitting at the same time. Because more fabric lies on your needles, it's easier to keep the whole works sunny-side-up when you join for a circular project.
A note to the unconvinced: if you've tried long tail casting on and gotten a tight, unyielding edge, you're not alone. But it's such a great method, I urge you to try again.
In most knitting directions, the first stitch is shown as a slip knot. I think they're second-rate, and at the very end of this post I show a better way. But because most knitting instructions call for a slip knot, you might as well know how to make one.
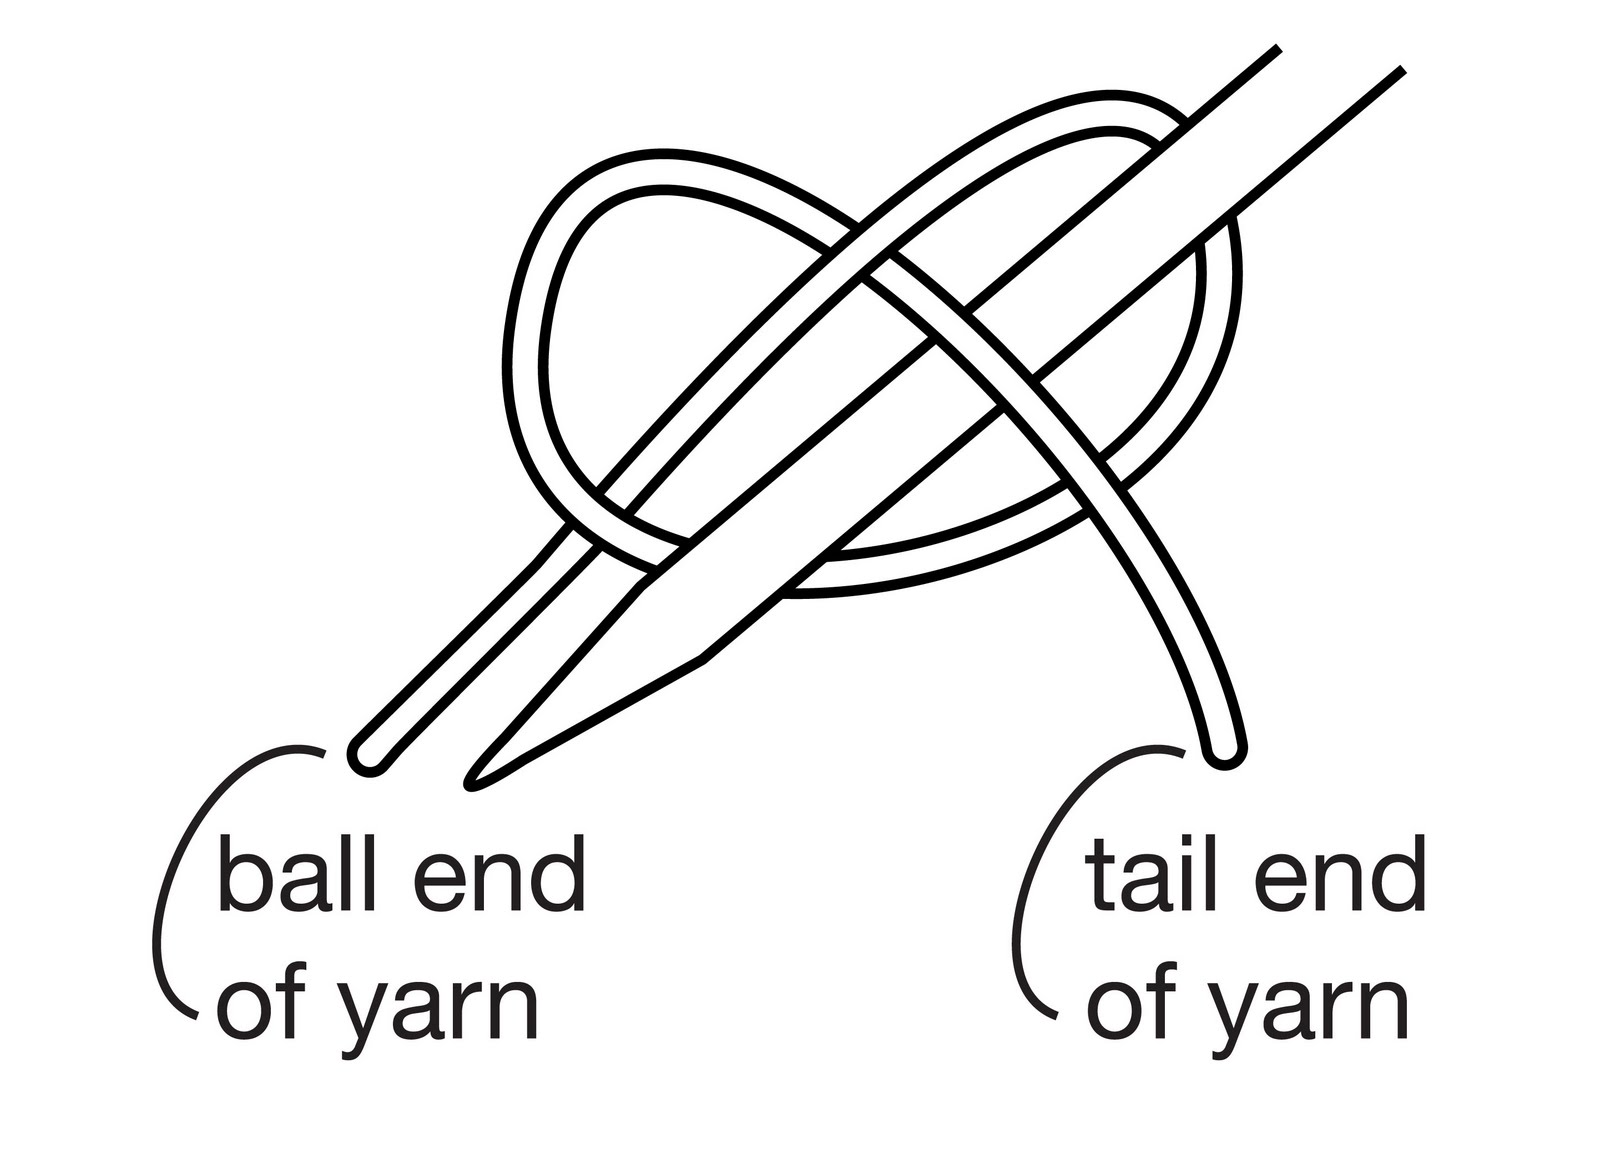
SLIP KNOT
 1) make a loop with the tail end of the yarn laying OVER the ball end of the yarn,
2) catch the tail end through the original loop and pull on the top of the new loop you just made.
3) insert two needles into the new loop, tugging the ball end,
4) snug the new loop around the two needles by further tugging on the tail end.
BTW: Here is a short cut to making a slip knot: Make a pretzel shape as shown below. Insert the needle as shown: over, under, over. Once the needle is through, hold onto both ends of the yarn and pull up with the needle. Then, tighten by pulling on the tail end. Voila: instant slip knot.

WHERE TO PUT THE SLIP KNOT
or: why is my tail always too short?
or: why is my tail always too short?
A lot of knitters DESPISE long tail casting on because the tail always winds up a few stitches too short. And there truly is no cure if your tail is too short the first time you try to cast on-- you'll just have to pull it out and do it again. But there IS a cure for moving the knot again and again, having the tail come out too short a couple of more times, and then suddenly, infuriatingly, having the tail coming out WAY too long.
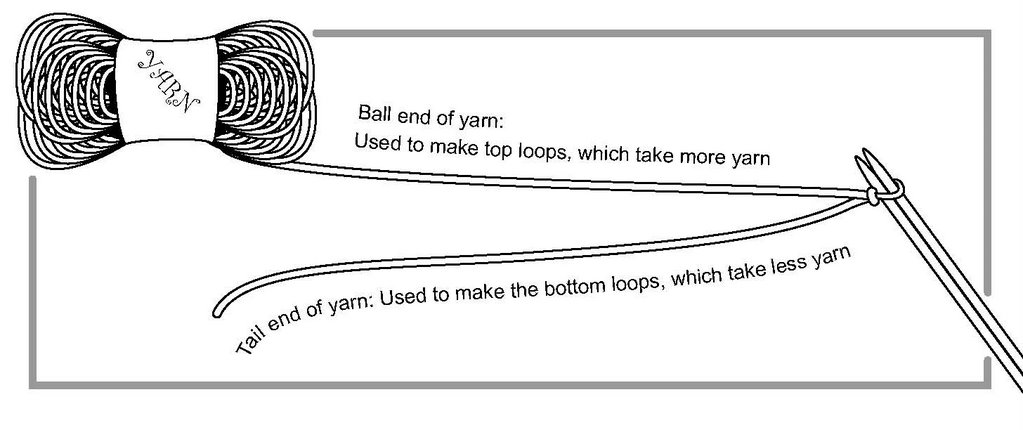 See, with long tail casting on, you're making a looped foundation row at the bottom, and putting a first row of knitting on your needles, both at the same time. The top loops are a lot bigger than the bottom loops and take up a lot more yarn. So, what makes sense is to use the ball end of the yarn to create the bigger top loops, and the more limited tail end to make the smaller bottom loops. My casting on instructions are very specific about which is the ball end of the yarn, and which is the tail end.
If you consistently arrange the yarn this way, then at least when you move your first slip knot to a new spot and try again, you've got a far greater chance of getting it right. And, if you always arrange your yarn the same way, experience will shortly teach you how much to pull out in the first place.
CASTING ON IN 6 STEPS
First step: putting the yarn on your hand
Thread the yarn on your left hand as shown. The ball end (the end going to the ball of yarn) is to the left, trailing from your little finger, and the tail end trails from your thumb. The slip knot you just made is partway along the tail end.First step: putting the yarn on your hand
 The yarn passes twice through your fingers. You tension the yarn by pressing together the little finger and the ring finger, as well as the pointer finger and the middle finger.
* * *
Second Step: Preparation
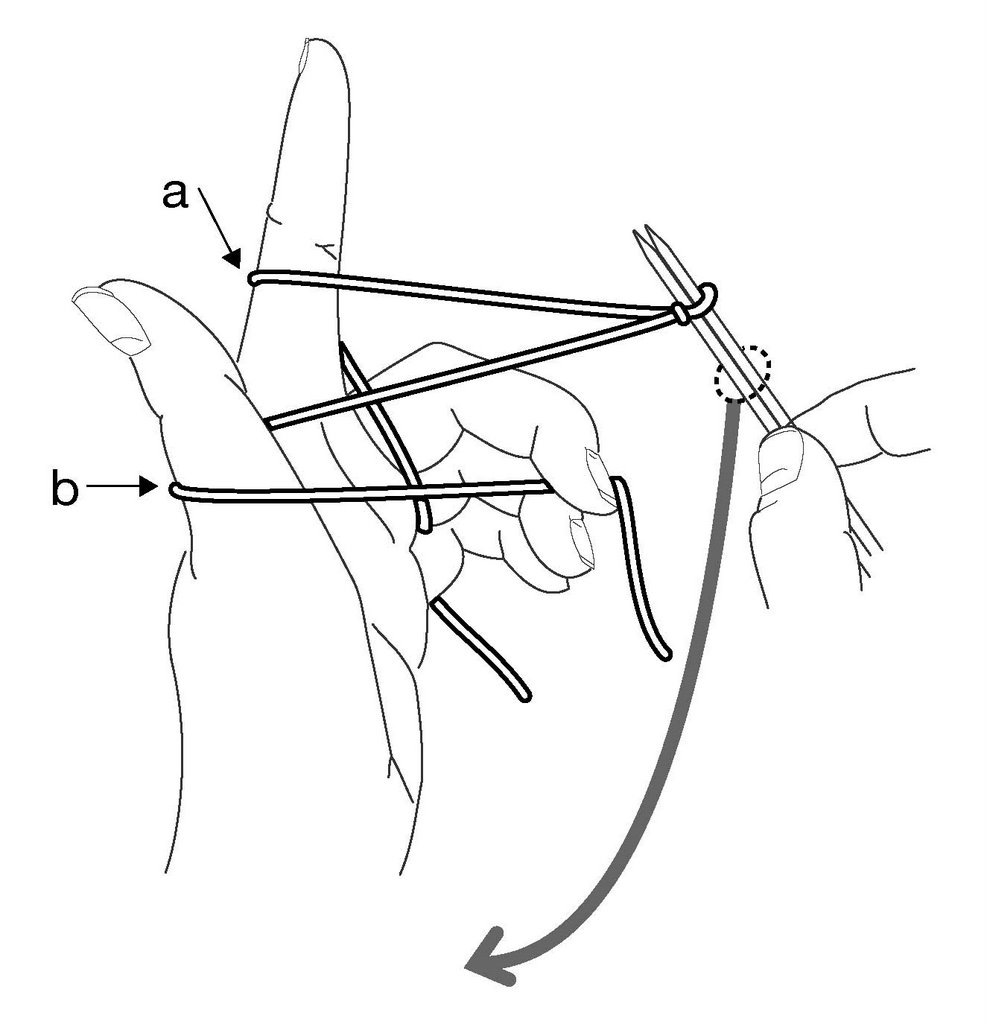
The strand marked "a" is the ball end of the yarn; "b,"the tail end of the yarn. Holding the needles with the slip knot in your right hand, arrange the yarn on your left hand as shown: the ball end remains between your ring and little fingers. Catch the tail end between your middle and fourth finger. Insert your thumb into part "b" --that is, the loop of yarn which stretches between the needles and your middle/fourth fingers. To get to the third step, swing your thumb towards you and up, as shown by the gray arrow.Second Step: Preparation

* * *
Third Step
Third Step
Once you've swung your thumb towards you and up as instructed in the second step, your hand should look like the picture below. To get to the fourth step, swing your right hand down, as shown by the arrow.
 Your ring finger has a lot to do. The base of your ring finger is pressing against the base of your little finger to hold the ball end of the yarn in tension. The top of your ring finger is pressing against your middle finger to hold the tail end of the yarn in tension.
* * *
Fourth Step
Fourth Step
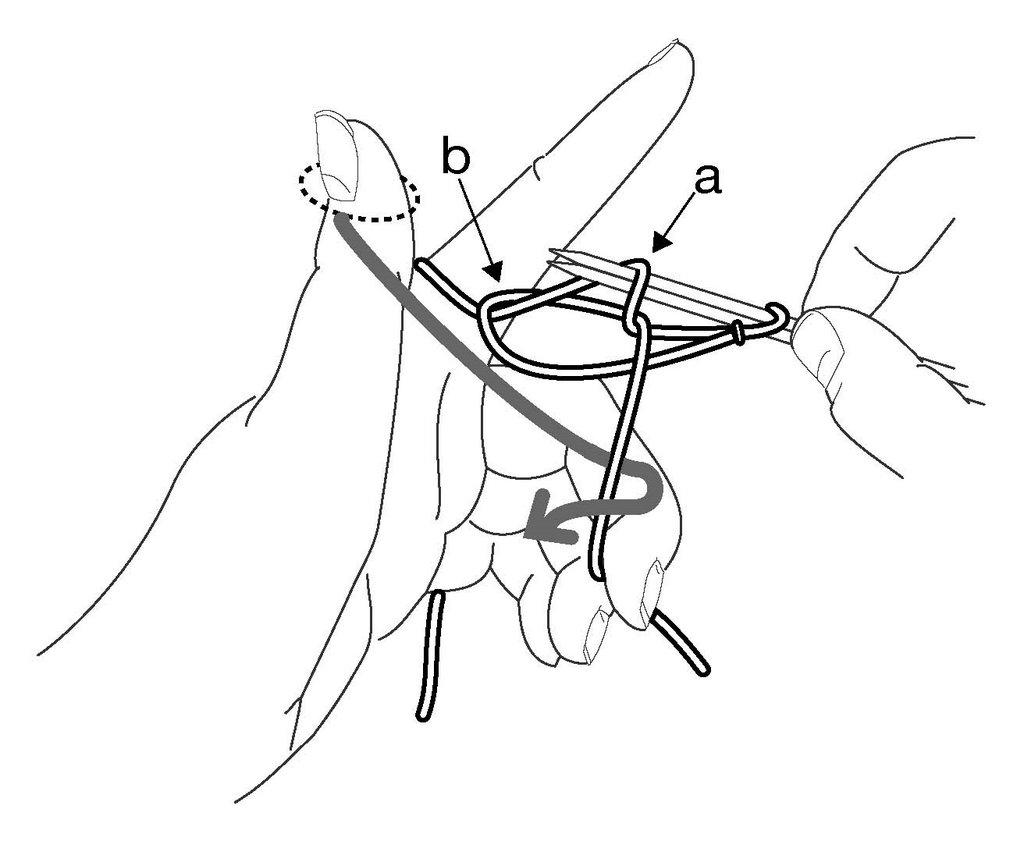
Once you've swung your right hand down, as instructed in the third step, your hand should be positioned as in the picture below. To get to the next step, follow the gray arrow: insert the tip of the needles through loop "b" on your thumb, and hook them around the front part of loop "a."

* * *
Fifth step
Fifth step
After hooking the front part of loop "a" with your needle as instructed in the fourth step, your set-up should look like the picture below. To get to the sixth (and last) step, swing the needles down and towards you, bringing loop "a" through loop "b." At the same time, swing your thumb down and out of loop "b."

* * *
Sixth step
Sixth step
After you've removed the needles and your thumb from loop "b," loop "b" is left wrapped around loop "a." In other words, what you've done is draw loop "a" through loop "b." Loop "a" is a stitch in the first row of knitting, and loop "b" is the foundation row through which that loop passes.
Long tail casting on is the same thing as making a foundation row of backwards loops and then knitting your first row into those loops. But making the foundation row and the first row at the same time is far easier than making the foundation row first, then trying to knit the first row into loops which skitter maddeningly around your needle.
If you follow the gray arrow and pass your thumb around the yarn below the newly cast-on stitch, you'll see that your hand is in the same position as step 3, above. From here out, repeat steps 3 through 7 over and over again until you have the correct number of stitches on your needles.
One last, but VERY IMPORTANT thing: When you complete the cycle of stitch creation and swing your thumb into loop "b" to make all look as it does in step 3, you are tightening up the bottom loop of the previous stitch. It is NOT necessary to yank that loop as tight as possible as you swing your thumb up. Rather, it is best to be mild in this adjustment. A tight and constrained long-tail cast on is directly traceable to an over-tightening of the bottom loop in this last step.
* * *
When you've cast on the correct number of stitches, remove one needle from the loops. There are all your stitches, ready to be knitted. They'll look loose, but after a few rows of knitting, you'll see that they magically adjust to the correct tension. (You COULD have cast on over one needle, very, very loosely, but it's hard to adjust your tension freehand like that.)* * *
MISTAKES AND HOW TO AVOID THEM
MISTAKES AND HOW TO AVOID THEM
Here are some notes to the wise, so you don't make the same stupid mistakes I do, over and over again.
1) Count your stitches. I often count the stitches as I cast on, only to find (five rows later) that I've got one stitch too many because I forgot to count the first stitch, which was made differently.
2) If you're making a pattern which requires you to count rows religiously, try to figure out whether pattern author cast on long-tail or some other way. Long tail casting on creates a first row as you cast on. Your first pattern repeat might have one too many rows if you don't count long-tail casting on as the first row. For further information about how to count rows in knitting, click here.
3) If you've pulled your second needle out, and then discover that you have too few stitches cast on, no worries. If you still have enough tail yarn left, simply hold the second needle next to the first and cast on some more stitches, then pull the second needle out of the newly added stitches: no need to unravel all the way to the beginning.
* * *
A LAST (opinionated) THOUGHT:
Getting rid of slip-knots
I've give the directions for the slip knot only because so many other knitting instructions call for it. But it's actually not a great technique for the first stitch of your hand-made project. No matter how you slice it, slip knot is a KNOT which is going to leave a hard nub in one corner of your knitting. That may not matter much in a heavy sweater, but in a lace shawl, it's a mess. In my opinion, the far better way to make the first stitch in knitting is by making a--
SIMPLE LOOP

The point of this blog is to infest your mind with all the little improving viruses which currently infest mine. So here's the best way, in my mind, to make the first stitch in your knitting. (FYI: this also works for the first stitch in crocheting.) If you make a simple loop, there's no knot. To start your knitting with a simple loop, just insert your needles and twist, and there's the first stitch, waiting on your needles. If the loop unwinds when you make the second stitch, that only means that you made the loop with the wrong end up. Twist it the other way and try again.
 Final tangential thought: Although slip knots are not a great way to start your knitting, they have many other uses (such as making provisional stitches intended to be unraveled.) But, slip knot's highest and best use is tying balloons onto children and vice versa. If you practice this skill you'll be the hit of the next birthday party as the "balloon mommy."
--TECHknitter
ADDENDUM: If you have a truly monumental number of stitches to cast on, and want to do it using the long tail method, click HERE to be taken to a different TECHknitting post about a nifty little trick which assures that you CANNOT run out of yarn.
You have been reading TECHknitting on "long tail cast on."


